Wednesday, October 2, 2013

5 Ways to Welcome Fall into Your Kitchen Home Decor

5 Ways to Welcome Fall into Your Kitchen Home Decor:

I was contacted by Stacey, a writer for the Commercial Appeal, for some ideas for fall decorating.  You can read her full article here.  These are the 5 items I suggested: 
  • Switch out the shades on your chandelier.  This could be to a fun fall color or even burlap. 
These are some great looking ones I just ordered in for a client.

  • Burlap continues to be super hot this fall.  Add it as a table runner or bunch up a square of fabric under your table centerpeice. 
  • Put out a clear bowl filled with in-shell mixed nuts.  This is an inexpensive (and tasty) way to add some color and texture.
  • Grab some branches from your yard.  If you are lucky enough to have birch trees, they have install fall appeal.  But any branch will add dimension and height.  If you want to jazz it up, you can spray paint them a fun mettalic color, like gold.
  • Group lanterns together for an eye catching display.  Add berries or candles to bring in some fall color or scents.


I love fall!  Just the thought of snuggling with a warm cozy throw and a bowl of soup makes me smile.  So, let's get our homes ready to celebrate as the cooler season approaches!


Pin It

Tuesday, September 24, 2013

How to DIY a Paper Covered Book

 
You may have seen these books in boutique stores and wondered how to do it yourself (I know I did).  So I got an old book and decided to jump in and try it out.  I didn't want to just make a book cover that slips over the cover, but one that became part of the book.  By covering a book yourself, this allows you to pick a book sized to your space and covered to coordinate with your decor.

Here is how I did it:

First I gathered my supplies.  You will need a hardcover book, scrapbook paper, Mod Podge (I used Matte finish), a foam brush, and a paper trimmer or craft knife (not shown). 
I chose 2 pieces of scrapbook paper, one for my binding and one for the cover.  You could also use wrapping paper or handmade paper.


Next I lined up the edge of the paper I was using to cover the binding and made a mark on where to cut.  Make sure you wrap the paper around the book while it is closed or you may come up short.  


I then lined up the edge of my black paper that I'm using on the binding with the edge of the lining on the inside of the cover.

I made a mark at the edge of the book so I could copy that measurement to use for the opposite end.  Also mark the top edge of the book too. 

Once I had my mark telling me how much paper I needed to wrap the edge, I could apply that same measurement to the top edge.  Now it's time to cut my patterned paper to the front and back cover.
 

On the patterend paper, I lined up the edge of the paper with the edge of the lining and marked where I needed to cut just like with the black paper. 
On went a layer of Mod podge on the side where my patterned paper will go.  I smoothed it out by going in the same direction with the brush.  It dries pretty quick and doesn't slide easily, so make sure you are putting your paper in the right place.  On the other side of the book, I decided to try a different cutting approach.  I glued first then cut it using a straight edge and craft knife.  The cut was not as smooth, but it is more forgiving if you don't have the paper in quite the right place before the glue dries.
Now that I have the paper adhered, I was ready to wrap the edges.
I folded one edge up, then folded in the point of the corner.  You repeat this process for the opposite edge parallel to the one you just did.
Once both corners are folded in, you can fold up the last edge.
 
After the paper is glued down, I applied 2 coats of Mod Podge over the top.  This also helped to seal all the edges firmly.
 
It only takes a few minutes to dry and you are ready to display your new paper covered book! 


Pin It

Friday, March 15, 2013

Fresh Strawberries

Last April, I went to my favorite Pick-Your-Own farm, Jones Orchard, and picked strawberries.  I have never been successful at growing them at home.  But this is even better, because you can pick the best ones! 

This is a fantastic recipe for using fresh strawberries.


Fresh Strawberry Yogurt Cake


The great thing about strawberries is that they freeze well.  I even threw the frozen strawberries in the blender and had fresh strawberry smoothies! 

I can't wait until the strawberries are ready for picking this year! Pin It

Tuesday, December 11, 2012

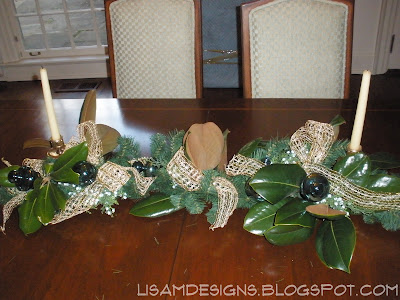
A Quick and Easy Holiday Table Centerpiece


This simple centerpiece is great to keep on the table throughout the holiday season.  You start with a plan piece of greenery and 2 candlesticks.  We added some (fake) spruce for interest, but you could just use the greenery.   Next, add in some fresh magnolia leaves, cut from the yard, to give it life.  Magnolia leaves hold up great and can be sprayed with a floral spray to extend their life.  Nestle in some glass ornaments and accent with ribbon, and you have a natural simple centerpiece.

Pin It

What to Make with Fresh Pears?

After I picked all these pears (see last post), I had to do something with them.  The apples were pretty easy, but the pears were a bit more challenging.  I picked a variety of pear called the Keiffer, which is a crisp pear that is good for baking. So here is what I have done with them.


I made Pear Bread,which is really a quick bread only made in a bundt pan.
A few notes: I diced my pears rather than grate them and used pecans rather than walnuts.  I only ended up needing 2 pears to make 2 cups. I did use butter, not oil, and cooked it for 60 minutes.  If I had let it go any longer, it would have burned.
This made a great breakfast bread.

I also made a Pear Crisp from the Pioneer Woman. Sorry I didn't get a picture. 

And lastly, I canned Ginger Pear Preserves.  I got the recipe straight from the Ball jar makers themselves.
These would make great gifts as well.  I added a tag and some ribbon.

I hope I have given you a few ideas for fresh pears.

Pin It

Friday, October 5, 2012

Apples and Pears

As you can tell by now, I love to go to the Pick-your-own local farm for fresh fruit.  And fall is apple and pear season.  So, I decided to pick both.

The type of apple I picked is the Arkansas Black apple, which I found is a great baking apple and derived from the Winesap.  Since it is so great for baking, I tried this Apple Dumpling recipe from the Pioneer Woman.  Soo good and easy too!  Click on the link for the recipe.

I am planning on canning some apple pie filling and peach preserves.  So I will post that as soon as I do.

I really love the experience of picking your own.  And I like that in the process I am helping local farms and being green.  Oh, and not to mention you have to make something with all that yummy fresh produce! 


Pin It

Organizing Gift Card Balances

If you are like me, you get a lot of gift cards as gifts.  You then have to call on the balances each time before you use them, so you know how much you have left.  Or you wrap the receipt around the gift card, but with fading ink, soon can't read it.  Here is what I have found works for me.
 I write down the balance and the date on the sticky part of a post-it note, cut it out, and attach it to each card.  It doesn't fall off or get in the way of scanning.  I then update it as the balance changes.  Now I know how much I have left to spend.  Pin It