Monday, June 18, 2012

Peaches!

I am so fortunate to live close to a pick-your-own farm, Jones Orchard in Millington, TN.  If you don't know where one is in your area, this is a great website to help you locate one close by.  www.pickyourown.org  Click on the "start here to find a farm near you" button on the top left.  Then click on your state.  Scroll all the way down and it lists all the farms for each county and their info.

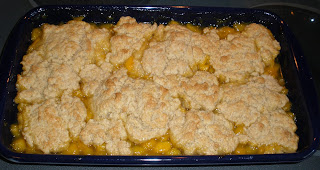
Just walking in to the area with the peach trees was enough to make your mouth water.  Such a glorious aroma!  I filled up my basket (for a great price, I might add) and headed home to see what I could make.  The one request my boyfriend had was peach cobbler.  Since most recipes called for canned peaches, I decided to look in the classic Betty Crocker red and white cookbook.  And there was a recipe for cobbler using fresh fruit, which I included below.

You could really taste the just-picked freshness!  What a great activity to do with the kids...they can see food from farm to table.  Plus, you get to support your local farms and community.  I encourage you to take a break from hectic life and stop and smell the peaches...it's good for the soul and the tummy!

Fruit Cobbler
Peach Filling (see below)
1 cup all-purpose flour
1/4 cup suar
1 teaspoon baking powder
1/2 teaspoon cinnamon
3 tablespoons butter
1 beaten egg
3 tablespoons milk

Peach filling:
In a saucepan combine 1/3 to 2/3 cups sugar, 1 tablespoon cornstarch.  Add 1/4 cup water. Stir in 4 cups fresh unsweetened peach slices.  I skinned my peaches and chopped them up, rather than doing slices.  Next time, I think I would add a little extra peaches.  Cook and stir till thickened and bubbly.

Prepare filling.  Keep hot.  For topping, mix flour, sugar, baking powder, and cinnamon.  Cut in butter till mixture resembles coarse crumbs.  Combine egg and milk.  Add to flour mixture, stirring just to moisten.

Transfer filling to an 8x8 baking dish.  Drop topping into 6 mounds atop hot filling.  Bake in a 400 degree oven for 20 to 25 minutes or till toothpick inserted into topping comes out clean.  Serve warm.  I also doubled the recipe because I knew I would want more :) Pin It

Monday, June 11, 2012

Keep Your Existing Tub

Yep, I said keep it!  I know you wouldn't think a designer would say to keep anything existing about a dated bathroom.  But if your tub is neutral and in good shape, consider keeping it.  With a little freshening up, this could be a great way to stretch your budget.
Take a look at the first one...
 Very plain (and boring) cultured marble tub.  This is the first thing you see when walking into this bathroom.  And after...

I removed the side splashes and shelf behind the tub.  Then added mosaic tile to the surround and a granite shelf.  We updated the faucets and added a wood paneled tub apron.  A tip: These are actually operational cabinet fronts so you have access to the plumbing.  Now that's a tub worth being a focal point!
   
How about this one...
 Another boring tub, in this case acrylic.  And after...
Again, I removed the side splashes surrounding the tub and added tile with a mosaic insert.  This time I was able to use a tiled tub apron since we added an access panel to the plumbing in a closet located behind the tub spout.

Now on both of these projects, the customer originally thought they wanted a new tub because they were unattractive.  Both were pleasantly surprised with the outcome.  And I was able to use that money elsewhere.


Pin It